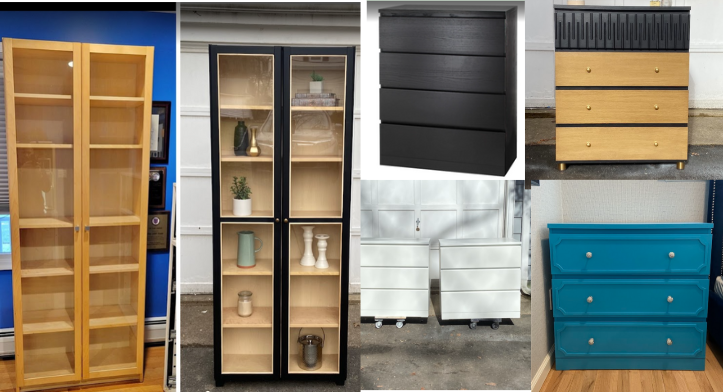
IKEA furniture is known for its affordability and versatility—but let’s be honest, the basic finishes don’t always suit every style. The good news? With the right prep and paint, you can completely transform even the most budget-friendly pieces into something that looks custom and high-end. Whether you’re refreshing a well-loved item or customizing a Facebook Marketplace find, this guide will walk you through exactly how to paint IKEA furniture for a durable, professional-looking finish.
**Some of the links in this post are affiliate links, which means I may earn a small commission—at no extra cost to you—if you make a purchase through them. Thank you for your support!**
Prep work is the foundation of a smooth, long-lasting paint job—skipping it can lead to peeling, chipping, and scratching, especially on IKEA furniture.
- Clean with a degreaser. Krud Kutter is my favorite. Primer and paint won’t stick to a dirty surface!
- Fill then sand smooth any imperfections with the appropriate filler. Here are the 3 I use for different purposes:
- Small imperfections: Bondo Glazing & Spot Putty
- Medium imperfections: DAP Plastic Wood
- Large imperfections: Bondo Wood Filler (2-part formula)
- Scuff sand the body of the piece with a medium to fine grit sandpaper. I typically use 180-220 when scuff sanding. “Scuff sanding” refers to scuffing up the surface. This helps to remove/scuff the shiny, slick surface, which in turn helps the primer and paint to adhere correctly.
- This can be done by hand, but I use a variable speed orbital sander similar to this one. It’s inexpensive and gets the job done quickly! I even rigged it to be attached to my shop vac to help with dust collection!
- Wipe down the piece to remove any sanding dust. I use a damp paper towel, followed by a tack cloth.
Now that your piece is prepped, you’re ready to start painting! The paint and primer that I use and recommend in this article are my tried and true combo for painting IKEA furniture successfully.
- Apply the first coat of BIN Shellac Primer (NOT the “Advanced” formula). This shellac based primer is designed to stick to slick surfaces, and in my experience, there is nothing better for adhesion. Period. Yes, it is expensive, no you cannot substitute it for something cheaper. On large, flat surfaces I roll on the primer using a 4″ high density foam roller and for intricate or detailed parts, I buy & use the spray can version.
- After the first coat dries, do a “scratch test” in an inconspicuous spot using your finger nail. The primer should not scratch. If it does, give the primer more time to dry and cure before moving on. After it passes the scratch test. you will sand the surfaces using 400 grit sandpaper. This primer will create a super fine dust, and sanding in between coats helps to get a smooth finish!
- Repeat steps 1-3 for the 2nd coat of primer. **I throw out the foam roller when I’m done with it…easy clean up!
- Wipe with a damp paper towel, followed by a tack cloth.
It’s finally time for paint! I exclusively use Sherwin Williams Emerald Urethane Trim Enamel paint. Some of my favorite features of this paint are that it self-levels for a smooth finish, hardens as it cures for added durability, and cleans up easily with just soap and water. It also doesn’t require a top coat…seriously! While it is pricey, I tend to stock up while they have sales, or buy “mistints” for a huge discount! Did you know that you can buy paint untinted when it’s on sale, then you just bring the paint back with your receipt when you decide on a color and they will tint it for you for free!
5. After mixing the paint well, it can be applied with a 4″ foam roller or 1/4″ nap roller. I find that either of these rollers, combined with the paint’s self-leveling properties, provides a smooth finish. If you are interested in investing in a paint sprayer, I recommend the Wagner Flexio paint sprayer. It has customizable settings, doesn’t waste a lot of paint like some other sprayers, is easy to clean, and provides a smooth, professional-like finish.
6. When the first coat is dry, lightly sand with 400 grit sandpaper.
7. After 4 hours, repeat steps 5 and 6 at least one more time for 2 coats total (not sanding after the final coat!) Depending on the paint color and application, a 3rd coat may be necessary.
It typically takes 7-10 days for the paint to fully cure, so it’s best to wait that time before handling and using.
Painting IKEA furniture is a rewarding way to elevate affordable pieces and make them truly your own. With the right prep work and materials, even the simplest item can have a custom, high-end finish that lasts. Whether you’re updating a single piece or transforming an entire room, taking the time to do it right will pay off in both style and durability.