
Dining Room IKEA Built-Ins
IKEA PURCHASE LIST
1 Havsta storage combo with doors
1 Havsta storage combo with glass doors
2 Havsta storage cabinet with base
LUMBER & MISC PURCHASE LIST
2x3x8 studs
1/2 inch 4×8 red oak plywood
1x4x8 red oak
Baseboards to match current
Quarter Round
Hazelwood Stain
TOOLS USED
Skil Tile Saw
I love using IKEA cabinets as the base for my built-ins. They help to keep costs down, are easy to assemble, and there are so many to choose from!
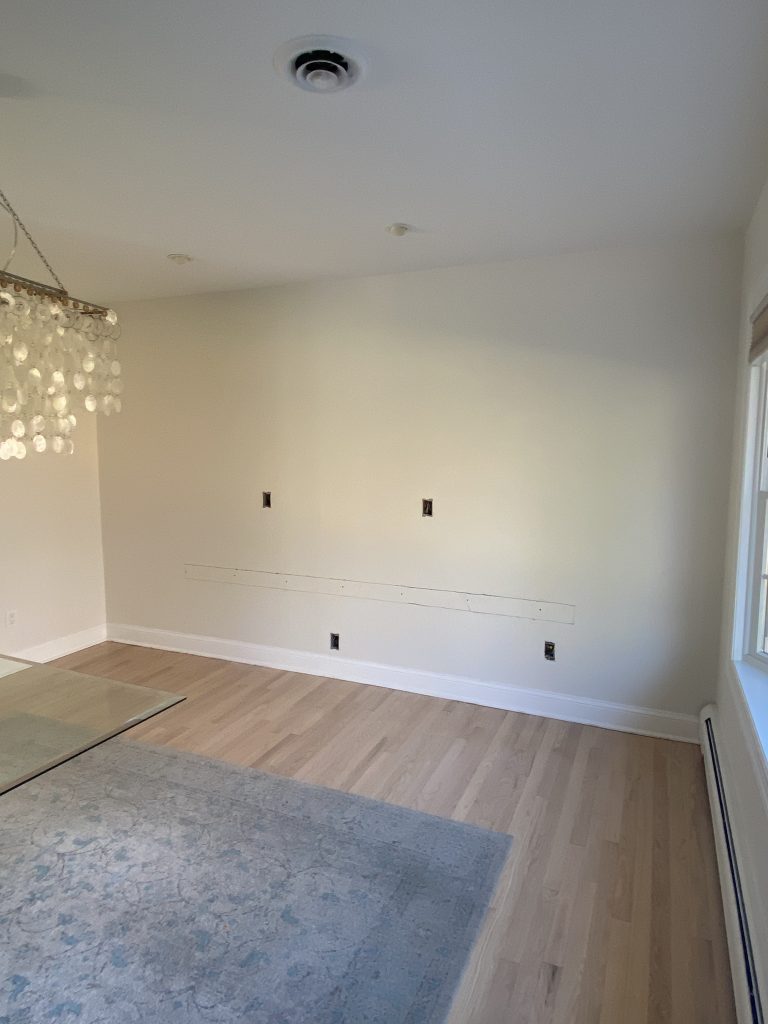
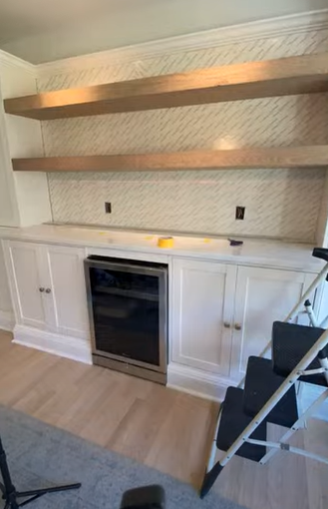
For this project, we started with a blank 13.5 foot wall and removed the existing baseboards. My client wanted a mix of storage, function, and beauty, including a tall cabinet on either end, counter-height cabinets with a countertop and a beverage fridge in the middle, with wood floating shelves hanging above.
I started by assembling 4 Havsta units: one storage combo with doors, one storage combo with glass doors, and two cabinets with bases. I also installed my own champagne bronze handles and knobs, instantly making the cabinets look more custom! These cabinets came with their own 4-¾” base, however, the current baseboards are 5-¼” so I had to raise the cabinets a bit off of the floor so that I can wrap the baseboards around them to get that “built-in” look. I used 2×3’s to build the bases, which are actually 1.5”x2.5”. I turned the 2×3’s on their sides, so that they are 1.5” tall, and attached them to each other and into the studs in the wall. When I placed the cabinets on top of the bases, there was now enough room to place the baseboards, because 1-½” + 4-¾” = 6-¼” and the baseboards are 5-¼”.
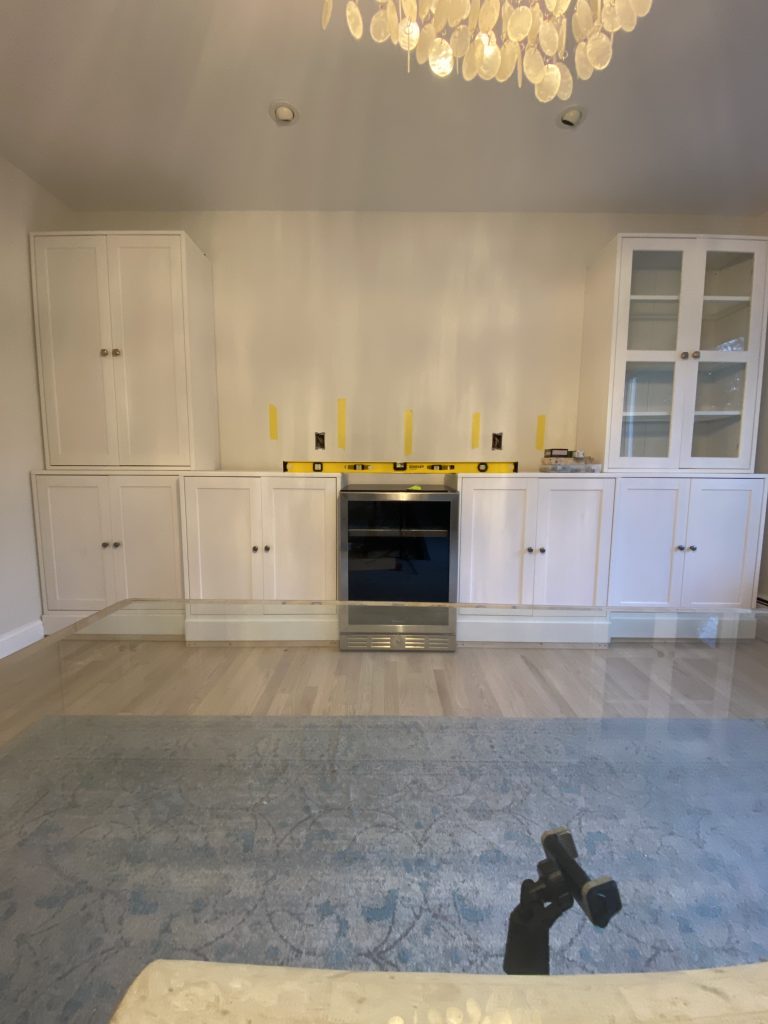
I followed the instructions from IKEA for attaching the cabinets to the wall, and used anchors where there weren’t any studs, leaving about 24-25” open in the middle for the beverage fridge to be able to slide in. For added security, I attached the upper portions of the havsta to the lowers by using screws from underneath, and used small L-brackets to attach the uppers to the wall above. Finally, I attached the cabinets to each other by using screws towards the front, and towards the back.
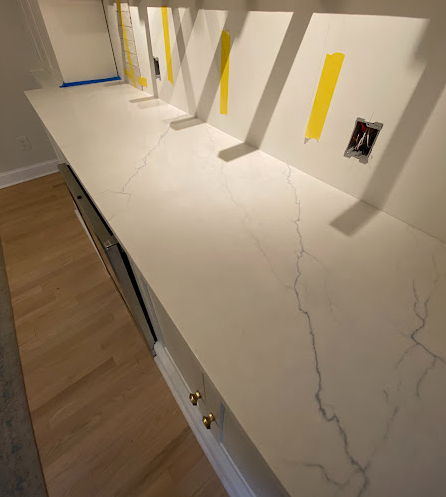
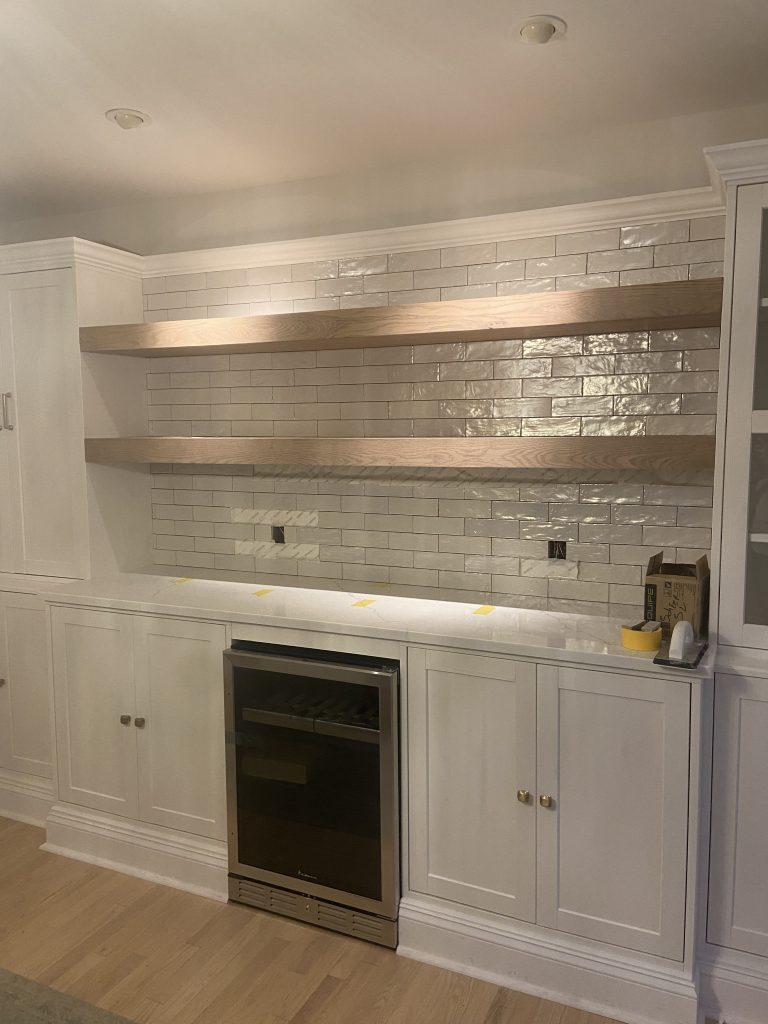
Part of my philosophy is a “save/splurge” model, where I save on certain items (in this case, the cabinets), so that I can splurge on other things (like quartz!). Once all of the cabinets were installed, the countertop was templated for quartz. I was able to use a “remnant” piece of quartz which helped to keep costs down as well. Remnants are essentially the leftover pieces from other peoples’ projects, that stone fabricators resell at a discount. Luckily, my local stone & tile shop had several options of quartz to choose from, and we chose a beautiful white quartz with gray and blue veining. While the counter was being fabricated, I worked on “building in” these units.
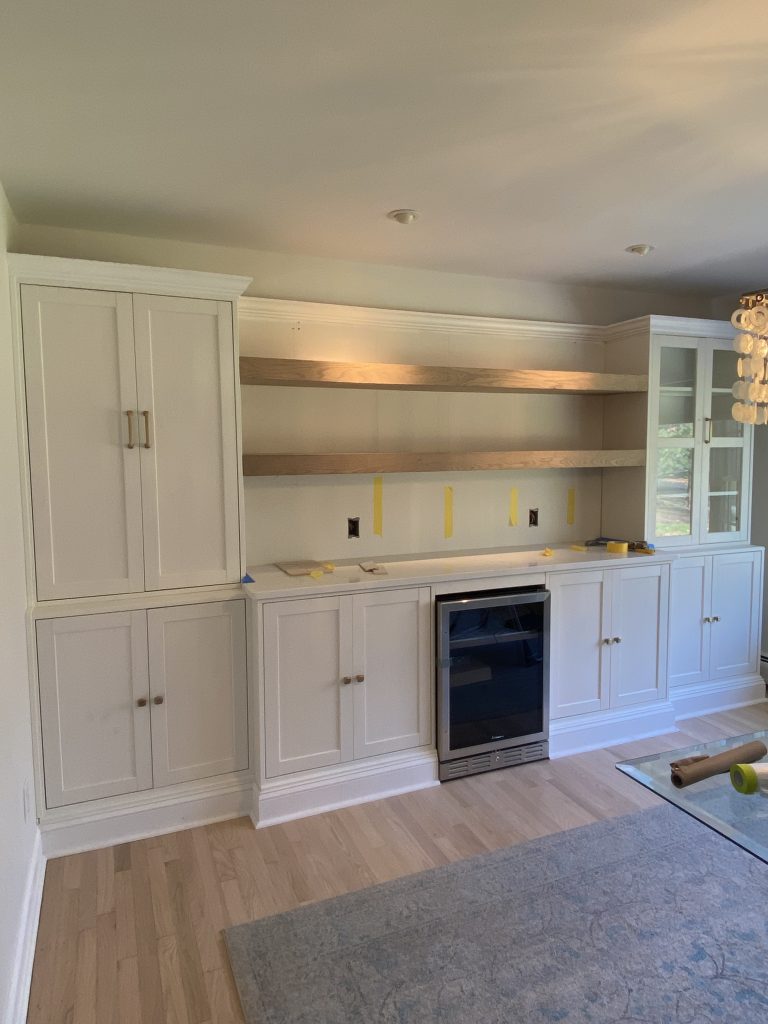
I first installed crown molding around each tall unit, and across the back wall connecting them. The crown molding across the back wall provided a “stopping point” for the backsplash that would eventually be installed, because these cabinets did not go to the ceiling. Using CA glue and miter spring clamps really helped to get tight crown corners! I attached the crown to the cabinets using my 18g brad nailer, and I used a few 23g pin nails to keep the corners connected and tight. Following the crown, I wrapped the baseboards around the unit, which, in my opinion, always changes the look from “IKEA” to “custom built in.” The new baseboard had to meet the existing baseboard in an interior corner, so I coped the new baseboard and it fit seamlessly, as if it was original! After installing both the crown and baseboards, I used wood filler and caulk to fill any flaws and nail holes before painting 3 coats of a semi-gloss paint that matches the current moldings in the house.
When it came time to plan for the floating shelves, they were to be about 7.5’ long, so I knew that they needed to be sturdy. I designed them to have a bracket attached to the wall, hitting several studs, and then the shelves would slip on/over the bracket. The brackest were made from 2×3’s, with arm supports attached about 10” apart, being sure not to place them where I marked the studs in the wall to be. I’ve seen some use pocket holes to connect the arms, but I chose to attach them from the back using 3.5” screws. I attached them to the studs using 4” screws, while using a level and hitting several studs.

To build the shelves, I used ½” red oak plywood and asked the lumberyard to cut it down to approximately 13” wide, the depth of my shelves. Then, I used my circular saw and a straight edge to cut down the length. The plywood was the top and bottom of each shelf, while a 1×4 piece of red oak was for the front (real dimensions: ¾”x3-½”). There are no sides because these will slip in between the two end, tall cabinets. Here’s the math for the shelves: the brackets are 2.5” tall so the interior of the shelves have to be at least 2.5”. Each piece of plywood is ½” (top and bottom, so 1” total), so 2.5”+1=3.5”…the height of the 1×4 is actually 3.5” so this will be the front facing piece, with the seams on top and bottom, not in the front! While building the shelves, I used wood glue, clamps, and pin nails to hold everything together while the glue dried.
While the glue was drying, I used scrap pieces to test stain colors. Our goal was for them to remain light, while trying to coordinate with the wood floors. Before staining, I sanded with 120 grit, then 180 and wiped them clean of any dust. I usually use pre-conditioner when staining, but red oak is a hardwood and not known for blotching, so I opted to skip it. I did two coats of Varathane Hazelwood, and followed it with 3 coats of polyurethane on the tops and fronts of the shelves, and one coat of poly on the underside. I knew that slipping these 7.5’ shelves onto the brackets was going to be a two-person job, so I enlisted the help of my best friend’s husband to help me, and I could not have done it without him! Despite measuring multiple times, I had to sand down the ends of the shelves several times in order for them to fit. We made at least 20 trips back and forth from the garage before finally slipping them on successfully! They were such a snug fit that I didn’t even feel it necessary to secure the shelves to the brackets. You can tug on them and they are not going anywhere!
Once the shelves were in place, it was time for the last step…tiling! I chose to tile last so that I could tile around the shelves and not have to drill through the tile. The tile was a beautiful 2.5”x8” ceramic tile with a natural edge and textured pearlescent from The Tile Shop. I chose to apply the tile using Musselbound adhesive instead of traditional thinset. While Musselbound is a bit more expensive than thinset, it applies like a really sticky double sided tape, which is much easier (and cleaner!) than thinset. It also allows you to grout the same day, which isn’t possible when using thinset.
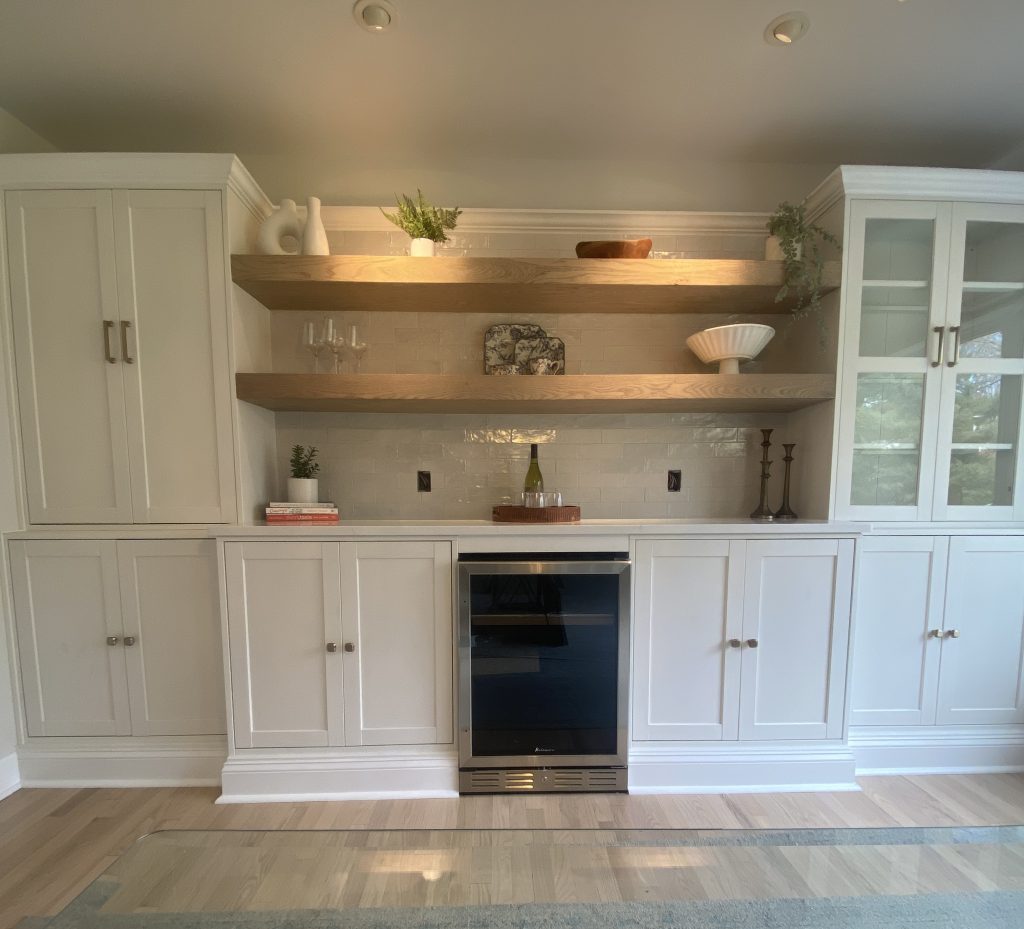
After peeling the backing and sticking it to the wall, I was ready to install the tile. I started in the middle, and used my laser level to ensure my first row was straight. You simply peel the front protective layer off, like a sticker, and stick your tile to it. Try to get it right on the first try, because unlike thinset, you cannot wiggle it into place. When I got to the ends of the row, I used my manual tile cutter. Once I was sure my row was straight, I used my trowel to firmly press all of the tiles and permanently attach them to the wall. I installed all of the whole tiles and the ones I could use the manual cutter first, saving the pieces requiring the wet saw for last. The tiles must be 100% dry before attaching them to the Musselbound, so I turned on the oven to 250 degrees, and after I cut the tiles on the wet saw, I placed them in the oven to dry. When dry, I finished installing the tile and I was ready for grout. I chose pre-mixed grout in the color Bright White and applied it following the directions on the tub, making sure to swap out for clean water every so often. Finally, I styled the shelves using some of my favorite staging pieces: faux greenery, books, and a mix of vases/vessels.
This build was one of my bigger projects, and I’m so happy with how it came out! It’s stunning! It was my first time using Havsta units for built-ins, but definitely won’t be my last!


2 Comments
Curious how your middle portions stick out further than the ends? The cabinets all have the same depth, did you just push them up a little before attaching them thus allowing the depth of a beverage fridge?
Yes, I pulled them forward a bit so that they’d be flush with the beverage fridge. I installed 2-3 pieces of 2×4 into the studs and then attached the cabinets to that blocking. I knew the countertop would cover the gap!