
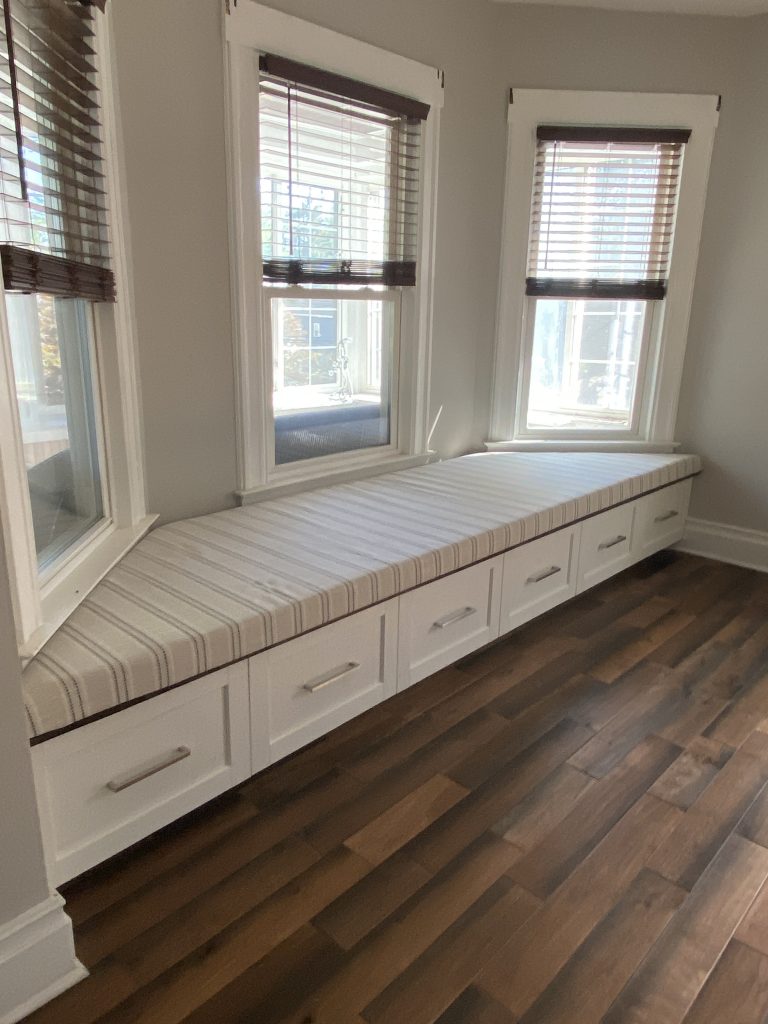
Every bay window needs a bench! And who doesn’t want or need more storage? Keep reading to see how I turned IKEA kitchen cabinets into a nearly 12 foot bay window seat.
IKEA PURCHASE LIST
4 Sektion wall top cabinet frames 24x24x15
4 Maximera drawer, high, 24×24
4 Maximera add-on side for drawer, high
6 Enkoping drawer fronts, 24×15
LUMBER & MISC PURCHASE LIST
(8) 2x4x8 studs
(2) ¾: 4×8 birch plywood
(2) 1x4x8
TOOLS USED
First off, I should have removed the baseboards, but I didn’t. Couldn’t tell you why, but later in the project, I definitely wish I had! I assembled the 4 sektion cabinet frames and the 4 maximera drawers (do not install the drawers yet!). The extra 2 drawer fronts are for the “faux drawers” (one on each end) to accommodate for the slant in the walls of the bay window.

Next, I built a base out of 2×4’s for the cabinets to sit on. The base allows for a toe kick or baseboard to be added, and gets the cabinets off the floor to ensure the drawers open smoothly. I attached the frame into the studs in the back and side walls with 2-½” screws. I also added some additional supports: for the faux drawer fronts to attach to, and for the benchtop to rest on, including cleats installed into the wall (studs) and vertical supports attached to the frame that I cut to the same height as the cabinets. These additional supports ensure that the benchtop doesn’t rest solely on the tops of the cabinets. I know that this bench will get plenty of use, so I wanted to make sure that everything is secure and well supported.

My next step was to install the cabinets onto the base, but in hindsight, I should have installed the toe kick first. I waited until the end and wasn’t able to get my nail gun under there, so I had to use adhesive. I attached the cabinets to one another using clamps and 1-¼” screws, then attached them to the base with 2-½” screws. Once the cabinet boxes were secured, I installed the drawers, the drawer fronts, and the hardware. Now it was time for the part I was dreading (kidding, kinda)…cutting the bench top.

Not only was the trapezoid shape of this tricky, but the size of it made it difficult, and I didn’t want to miscut an $80 piece of plywood! Because the front side of the bench is 12 feet, I needed to join two pieces of plywood. I decided that the seam should be down the middle, from front to back. I knew that the cushion would cover the top, and edge banding would cover the front seam. I decided to use cardboard to make a template of the benchtop, then traced the cutout onto the plywood. Using a jigsaw and painters tape for clean edges, I cut the two pieces of benchtop. With a few minor adjustments and minimal gaps, the pieces fit into place. I wasn’t too worried about the gaps because I knew that you’d never see them after the cushion was placed on top. I attached the benchtop to the cabinet boxes by screwing them together from underneath using 1-¼” screws, and with brad nails into the cleats on the wall. I also needed to add a few small L-brackets to hold the benchtop down in a few spots due to minor warping.

Finally, I pre-conditioned the wood, applied two coats of a water-based stain in the color Ebony, and 3 coats of water-based poly.
I topped this bench with a custom cushion. Click here for that blog post!


1 Comment
Hi,
the link for the custom cushion is not available.
Thank you